.png)
 2 hours ago
2
2 hours ago
2
Preparing your home for a professional mold inspection is an essential step to ensure the process is efficient and thorough. Taking the time to properly ready your space allows inspectors to focus on identifying problem areas without unnecessary obstacles. Below are detailed steps and tips to help you prepare your home effectively.
Declutter Key Areas
Mold inspectors need clear access to various parts of your home. This includes spaces where mold is most likely to grow, such as basements, attics, and crawl spaces. Follow these tips:
– Remove clutter: Clear away items stored near walls or corners that might block access.
– Ensure visibility: Make sure areas around plumbing fixtures, such as under sinks or behind toilets, are unobstructed.
– Organize storage spaces: Tidy up closets, utility rooms, and other storage zones so they can be easily inspected.
Address Moisture and Water Issues
Because mold thrives in damp conditions, it’s important to identify any current moisture issues before the inspection takes place. Consider the following steps:
1. Check for visible leaks around pipes or ceilings and make note of these areas for the inspector.
2. Dry out wet areas using fans or dehumidifiers if possible; however, do not remove evidence of mold growth entirely as this may hinder proper assessment. 3. Inspect outdoor drainage systems (such as gutters) that could be contributing to indoor water problems.
Communicate with the Inspector
Providing inspectors with relevant information about your home can save time during the inspection process:
– Share details about previous water damage incidents or problems with high humidity levels in specific rooms. – Let them know if anyone in your household has been experiencing health issues potentially related to mold (e.g., allergies, respiratory problems). – Provide access instructions for locked spaces like attics or utility rooms.
Ensure Proper Ventilation
Maintaining airflow throughout your house ensures optimal conditions for a comprehensive inspection: – Open windows where possible before the inspector arrives. – Turn off HVAC systems temporarily so air circulation does not interfere with readings taken by specialized detection equipment.
Safety Precautions
For both your family’s safety and that of the inspection team: – Keep pets secured in another area of the house during the appointment. – Inform everyone in your household about scheduled inspections so they can plan accordingly.
Summary Table of Preparation Steps
| Task | Action |
| Declutter key areas | Remove items blocking walls, plumbing fixtures, and storage spaces |
| Address moisture issues | Identify leaks, dry wet spots (without removing evidence), check outdoor drainage |
| Communicate with inspector | Share past water damage details; provide medical history related to potential mold risks |
| Ensure proper ventilation | Open windows, turn off HVAC temporarily |
| Take safety precautions | Secure pets; inform household members |
Preparing ahead sets the stage for a successful professional mold inspection while ensuring minimal disruption to your daily routine. By following these steps carefully, you can help create an environment where potential issues are identified quickly and resolved efficiently.
Crucial Steps for Effective Mold Remediation Lakeland, FL: Before and After Inspection
Proper preparation and follow-up are key components of ensuring the effectiveness of a mold inspection. Whether you’re preparing for an upcoming inspection or addressing the results afterward, there are specific steps you can take to protect your home, health, and finances. Below is a detailed guide covering actionable steps before and after a mold inspection.
Before the Mold Inspection: Preparation Checklist
- Examine spaces that are prone to moisture, such as basements, bathrooms, kitchens, and attics.
- Note any visible signs of mold growth like discoloration on walls or ceilings.
- Pay attention to musty odors, which can indicate hidden mold.
- Remove furniture or clutter near areas where mold might be present (e.g., behind appliances or in crawl spaces).
- Ensure inspectors have access to HVAC systems, air ducts, plumbing fixtures, and water-damaged areas.
- Take photos of visible mold or water damage for reference.
- List any past water leaks or flooding incidents that could contribute to potential mold problems.
- Avoid cleaning or scrubbing suspected areas before the inspection as this can release spores into the air.
- Turn off fans and HVAC systems on the day of the inspection to prevent air circulation from spreading spores.
- Share any relevant details about your home’s history (e.g., past repairs or renovations).
- Discuss your concerns and identify priority areas you want inspected.
After the Mold Inspection: Next Steps
- Review the Inspection Report Thoroughly
A typical report will include:
| Section | Key Details |
| Visual Assessment | Notes on visible signs of mold growth |
| Air/Surface Testing | Results from samples collected during testing |
| Moisture Levels | Identification of high-humidity areas |
| Recommendations | Suggested remediation steps based on findings |
Prioritize Remediation Efforts
Depending on the severity of the findings:- Address minor issues with DIY solutions (e.g., cleaning small patches with vinegar or borax).
- For extensive contamination (>10 square feet), hire certified professionals who adhere to industry standards like those set by the EPA.
- Repair Underlying Causes
Prevent future outbreaks by fixing issues that contribute to moisture buildup: - Repair leaky pipes or roofs promptly.
- Improve ventilation in damp-prone areas using exhaust fans or dehumidifiers.
- Schedule Post-Remediation Testing
Arrange for follow-up testing after completing remediation efforts:- This ensures all traces of mold have been removed effectively.
- It also confirms that air quality has returned to safe levels within your home.
- Implement Preventive Measures
To safeguard your property moving forward:- Maintain humidity levels between 30%-50%.
- Regularly inspect gutters, downspouts, and exterior drainage systems.
- Replace damaged insulation or drywall promptly if it becomes wet.
Tips for Long-Term Prevention
To reduce future risks associated with harmful mold growth: – Monitor indoor humidity using a hygrometer. – Ensure proper insulation around windows and doors during colder months. – Conduct annual inspections for early detection of moisture problems in vulnerable areas like basements and attics.
Taking these steps before and after a comprehensive mold inspection will not only protect your home but also ensure a healthier living environment for you and your family over time.
Essential Steps for Effective Mold Testing Lakeland, FL: Before and After Tips
Preparing for and responding to a professional mold inspection is crucial for ensuring that your home remains safe and free from harmful mold growth. Taking the right steps before and after the inspection can help identify problem areas, prevent the recurrence of mold, and safeguard your property and health. Below, we outline key actions to take both before and after the mold inspection process.
Steps to Take Before a Mold Inspection
- Walk through your home and look for visible signs of mold, such as black, green, or white spots on walls, ceilings, or furniture.
- Pay close attention to areas with excessive moisture or water damage (e.g., basements, bathrooms, kitchens).
- Remove furniture or heavy objects blocking access to walls or floors that may need inspection.
- Ensure crawl spaces, attics, HVAC units, or other hard-to-reach areas are accessible to the inspector.
- Avoid using fans or HVAC systems before the inspection; increased airflow could disperse mold spores further into your home.
- Make note of previous water damage incidents in your home.
- Prepare documentation about recent repairs (e.g., roof leaks or plumbing fixes) that could relate to potential mold growth.
- Communicate Health Concerns
Notify the inspector if anyone in your household has allergies or health issues linked to mold exposure so they can take extra care during testing.
Steps to Take After a Mold Inspection
- Review Inspection Results
Once you receive the results of the inspection report: - Understand which areas are affected by mold.
- Review any recommendations provided by the inspector regarding cleanup measures.
- If remediation is necessary, schedule professional removal services immediately.
- Ensure any damaged materials (e.g., drywall or carpeting) are safely removed as part of this process.
- Fix Underlying Issues
Mold thrives in damp conditions; addressing moisture problems is critical: | Problem Source | Solution | |———————-|———————————–| | Leaky Plumbing | Hire a professional plumber for repairs. | | Poor Ventilation | Install exhaust fans in bathrooms/kitchens; open windows regularly. | | Roof Damage | Replace damaged tiles/shingles and seal gaps promptly.| - Clean Thoroughly
After remediation:- Use HEPA-filter vacuum cleaners on carpets and upholstery.
- Wash affected surfaces with EPA-approved cleaning agents.
- Take Preventative Measures To reduce future risks:
- Install dehumidifiers in high-humidity areas like basements.
- Monitor indoor humidity levels (aim for 30-50%).
- Regularly maintain gutters/downspouts away from foundation walls.
Long-Term Considerations
After addressing immediate issues post-inspection: – Schedule periodic professional inspections annually if your property has had recurring issues with moisture/mold. – Continue monitoring vulnerable spaces susceptible over time—like basements prone frequently damp climates etc — keeping vigilant ongoing maintenance priorities intervals
What to Expect from Professional Lakeland Mold Removal Services
A comprehensive mold inspection is a critical step in identifying and addressing mold issues within your home. Understanding what to expect during this process can help prepare you for the inspection and ensure you know how to act on the findings.
Initial Consultation and Assessment
- The history of water damage: Leaks, flooding, or excessive moisture in specific areas.
- Health concerns: If anyone in your household is experiencing symptoms such as allergies, respiratory issues, or skin irritation that may indicate mold exposure.
- Visible signs of mold: Discoloration on walls, ceilings, or floors, or an unusual odor suggesting potential mold growth.
This conversation helps the inspector focus on areas that may require closer examination.
Visual Inspection
- Visible mold growth: Black spots or discoloration on walls, ceilings, tiles, carpets, or furniture.
- Moisture issues: Stains from leaks or cracks in windowsills and plumbing fixtures.
- Structural vulnerabilities: Damaged drywall or flooring where hidden moisture could foster mold development.
Tools like flashlights and mirrors may be used to look into hard-to-reach spaces.
Moisture Mapping
- Moisture meters determine the amount of water present within building materials like wood or drywall.
- Infrared cameras detect temperature variations that indicate potential water damage behind walls or beneath floors.
Moisture mapping is essential because even small amounts of lingering moisture can cause significant problems over time.
Air Sampling and Testing (If Necessary)
- This involves collecting air from different rooms in your home using special pumps designed to capture airborne spores.
- These samples are sent to a laboratory where trained technicians analyze them for levels of common indoor molds as well as potentially toxic species such as Stachybotrys chartarum (commonly referred to as “black mold”).
Air sampling is particularly useful when no visible contamination exists but health symptoms suggest underlying issues.
Surface Testing
| Method | Description |
| Tape lift sampling | Adhesive tape collects spores directly from surfaces for lab analysis. |
| Swab testing | A cotton swab gathers material from suspect spots such as vents or tiles. |
Surface tests help determine whether specific areas need targeted treatment.
Summary Report with Recommendations
- The severity and location of any identified mold colonies.
- Sources of excess moisture contributing to its growth.
- Laboratory results (if applicable) detailing spore counts and types found.
- Recommended next steps for remediation tailored specifically to your home’s unique circumstances.
This report often serves as the foundation for hiring remediation professionals if needed.
Final Thoughts on Working with Inspectors
Choosing licensed inspectors ensures they follow industry standards during every phase of their work while using proper tools for diagnostics without causing unnecessary damage during evaluations—a key factor in protecting property value long-term while prioritizing family health immediately after inspections wrap up successfully
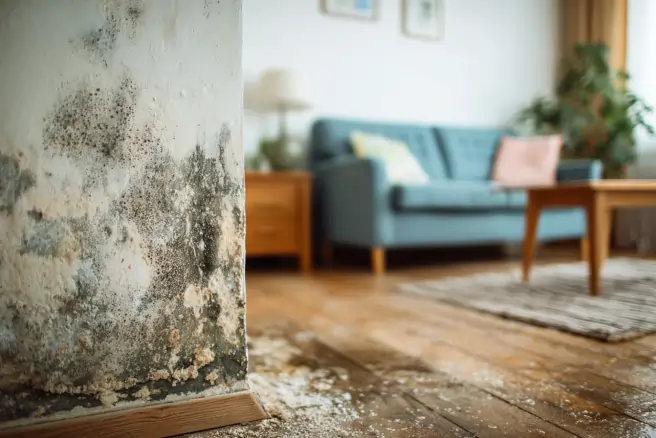
Effective Lakeland, FL Mold Removal Tips to Protect Your Home After Water Damage
Water damage can create a perfect environment for mold growth, putting the health of your home and its occupants at risk. Mold thrives in damp, humid areas, and without quick intervention, it can cause structural damage and health concerns. Here are key steps to safeguard your home after water damage.
Step 1: Act Quickly to Address Water Damage
Timely action is critical when dealing with water damage. The longer moisture sits untreated, the higher the likelihood of mold growth.
- Remove standing water: Use pumps or wet vacuums to extract as much water as possible.
- Dry affected areas: Use fans, dehumidifiers, and open windows to improve air circulation and reduce moisture levels.
- Inspect hidden spaces: Check areas like under carpets, inside walls, or behind furniture where moisture might be trapped.
Step 2: Clean and Disinfect Surfaces
Once the area is dried out, cleaning and disinfecting surfaces is essential to prevent mold spores from settling.
- Use a mixture of detergent and water to scrub surfaces that have come into contact with water.
- For non-porous materials like tiles or metal surfaces, consider using a bleach solution (1 cup bleach per gallon of water) for disinfection.
- Dispose of materials that cannot be salvaged (e.g., soaked drywall or insulation).
| Material Type | Action Required | Salvageable? |
| Hardwood floors | Dry immediately; sand if warped | Frequently salvageable |
| Carpets | Clean professionally; replace if soaked | Sometimes salvageable |
| Insulation | Replace entirely | No |
| Upholstered furniture | Clean professionally if small area affected; discard if saturated | Sometimes salvageable |
Step 3: Monitor Humidity Levels in Your Home
- Install dehumidifiers in damp-prone areas such as basements or bathrooms.
- Ensure proper ventilation by using exhaust fans in kitchens and bathrooms.
- Seal leaks around windows, doors, or foundations where moisture could enter.
Step 4: Repair Damaged Areas Thoroughly
- Roof leaks that may allow rainwater infiltration
- Cracks in walls or foundations
- Poor drainage systems around your property
Consider waterproofing measures like adding vapor barriers or improving landscaping drainage.
Step 5: Inspect Regularly for Recurring Issues
Even after taking preventive steps, it’s essential to remain vigilant about potential mold risks post-water damage.
Signs That Mold May Be Developing Again:
- Persistent musty odors
- Visible discoloration on walls or ceilings
- Increased allergy-like symptoms among household members
Schedule regular inspections with professionals if you suspect mold problems are resurfacing.
By being proactive about these steps following water damage, you reduce the likelihood of harmful mold growth while ensuring a healthy home environment long-term.
Recognizing the Need for HVAC Replacement to Prevent Mold Issues
Mold growth within a home can often be directly linked to issues with the HVAC (heating, ventilation, and air conditioning) system. A malfunctioning or outdated HVAC system can create an environment conducive to mold development by failing to regulate humidity levels effectively. Understanding when it’s time to replace your HVAC system is essential for maintaining a healthy, mold-free home.
Signs Your HVAC System May Be Contributing to Mold Growth
- Excessive humidity indoors: If your HVAC system fails to keep indoor humidity below 60%, it creates an ideal environment for mold spores to thrive.
- Musty odors: Persistent musty smells throughout your home may indicate mold growth within the ductwork or other parts of the HVAC system.
- Visible mold on vents or ducts: Discolored spots near air vents or inside ducts are clear signs of potential contamination.
- Frequent repairs: If you’re constantly repairing parts of your HVAC system, its inefficiency may contribute to poor air circulation and increased moisture levels.
- Poor airflow: Insufficient air circulation can lead to stagnant zones where moisture builds up, encouraging mold growth.
Why Replacing Your HVAC System May Be Necessary
- Enhanced humidity control: Modern systems are designed with advanced features that help maintain optimal moisture levels in your home.
- Improved air filtration: Newer models often include high-efficiency particulate air (HEPA) filters that trap mold spores and prevent them from spreading.
- Energy efficiency: An outdated unit typically uses more energy while failing to regulate conditions effectively. Replacing it with an energy-efficient model reduces utility costs while preventing excessive dampness.
Steps for Preventing Mold Issues After Installing a New HVAC System
- Hire professionals for seasonal inspections and cleaning of ducts and vents.
- Change filters regularly (typically every 1–3 months) based on usage and manufacturer recommendations.
- Use standalone units in problem areas, such as basements or bathrooms.
- Consider integrating a whole-house dehumidifier with your new HVAC system.
- Inspect windows, doors, attics, and crawl spaces for potential leaks that could introduce excess moisture into the home.
- Ensure ductwork is properly sealed during installation.
- Install monitors that track humidity levels and pollutant concentrations.
- Address any spikes in IAQ readings promptly by consulting specialists.
| Problem Area | Solution | Benefit |
| Excessive Humidity | Upgrade HVAC / Install Dehumidifiers | Reduces risk of condensation & dampness |
| Poor Airflow | Replace inefficient units / Seal ducts | Improves overall ventilation & circulation |
| Mold in Ductwork | Clean ducts regularly / Replace old units | Prevents spread of harmful spores |
By identifying when replacement is necessary and adopting proactive measures alongside installation, you can protect your household from future mold-related complications caused by inadequate climate control systems. Proper care ensures not only cleaner air but also peace of mind in safeguarding everyone’s health at home.
- How to Choose the Best Mold Removal Company Lakeland, FL for Your Home
- Expert Tips for Mold Remediation Lakeland, FL, When Buying a Home
- Finding the Best Mold Removal Company Lakeland, FL: Tips to Address and Prevent Mold Growth
- Effective Lakeland, FL Mold Removal Tips for Long-Term Prevention
- Top Reasons to Choose Professional Lakeland, FL Mold Removal Services
- Mold Testing Lakeland, FL: Tips to Keep Your Home Safe and Healthy
- Understanding the Role of a Mold Removal Company Lakeland, FL in Property Transactions

 English (US) ·